Device Migration Config
This procedure is only used to move devices to a VoiceConsole SaaS deployment. The procedure to move devices to an On Prem deployment is detailed here: Move Devices Between VoiceConsole On Prem Deployment Instances.
This option allows an easier, secure way via temporary JWT credentials to migrate devices to a VoiceConsole SaaS deployment. This can be used to migrate devices from an On Prem deployment to an SaaS deployment or to migrate devices from one SaaS deployment instance to another SaaS deployment instance (such as from a UAT environment to a production environment).
-
Source: The instance of VoiceConsole where the device currently is located. This can be an On Prem or SaaS deployment.
-
Destination: The instance of VoiceConsole where the device is to be moved. This must be an SaaS deployment.
The devices must be able to communicate with the destination instance of VoiceConsole. Verify all firewall rules have been updated as necessary.
Honeywell recommends testing the migration with one or two devices before a large migration of devices.
The migration profile includes the currently selected Site ID. If there are multiple sites on the source instance of VoiceConsole a different migration profile should be created for each site. Otherwise all devices in the destination are placed in the same site.
When moving devices between VoiceConsole instances, consider the site IDs may be different between the instances, for example SiteID3 in the original instance might be Chicago, but SiteID3 in the new instance could be New York. in that case, the best process is to move one device, configure that device for the appropriate site, then use TouchConfig to configure the additional devices.
-
In the destination instance of VoiceConsole:
-
From the VoiceConsole tab, select the Device Management tab.
-
Under Navigation, click Device Profiles.
-
Under Device Profile Actions, select Device Migration Config.
-
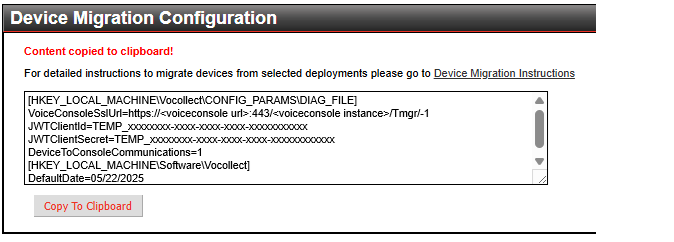
The Device Migration Configuration screen opens.
-
Copy the contents manually or click Copy To Clipboard if your browser supports it. An example configuration is shown below. Your example would have details on your VoiceConsole instance.
-
-
In the source instance of VoiceConsole:
-
From the VoiceConsole tab, select the Device Management tab.
-
Under Navigation, click Device Profiles.
-
Under Device Profile Actions, select Create new device profile and use this option to create a new device profile with the migration information. For more details see Create Device Profiles.
-
As necessary, complete other device profile screens.
-
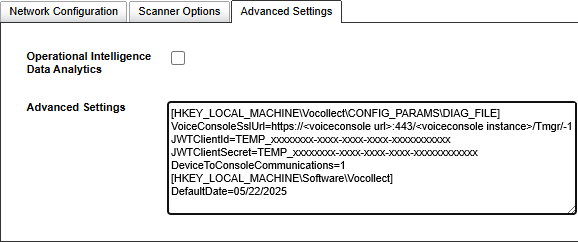
On the Configure Profile screen select the Advanced Settings tab.
-
In the Advanced Settings textbox, paste the contents of the clipboard.
-
Perform a profile load on the desired devices. See Load Device Profiles onto Devices.
When the device migration information is saved in the profile and viewed later, the line for DeviceToConsoleCommunications=1 is not displayed on the Advanced Settings tab. This is because after saving the profile the Device to Profile Communications setting on the Network Configuration tab is set to https.
-
-
In the destination instance of VoiceConsole:
-
Access the Devices screen to confirm the devices have migrated to the destination instance.
-
Reload a profile to the migrated devices
-
This ensures these devices are using a profile that exists in the exists in the destination of VoiceConsole.
-
The temporary JWT credentials are replaced with the expected main JWT credentials during this profile load.
-
-