Update a Headset or Battery Charger
Prerequisites
-
The Honeywell Accessory Update Utility is installed on a computer running a supported operating system.
-
The host computer has available USB ports. For updating multiple headsets, Honeywell recommends using a USB hub and Micro-USB cables.
-
The correct Honeywell USB driver is installed on the computer for every port to be to used for the update.
Update Device
-
Run the executable file to install the software update package to the local machine.
-
An SRX3 headset update file includes the version number and appears in this format:
HD-1500-Vnn-nn.H03. -
An SRX2 headset update file includes the version number and appears in this format:
HD-1000-Vnn-nn.H01. -
An SRX2/SRX3 charger update file appears in this format: CM-1000-Vnn-nn.C01.
-
An SRX-SL headset update file includes the version number and appears in this format:
HS-1100-Vnn-nn.H02. -
An A700/A700x battery charger update file appears in this format: CM-902-Vnn-nn.C02.
-
-
Connect one or more SRX2/SRX3/SRX-SL headsets and/or a single battery charger (for SRX2/SRX3 or A700/A700x batteries) to the system via USB cables. Ensure that each SRX2/SRX3 headset has a charged battery inserted prior to running the software update.
-
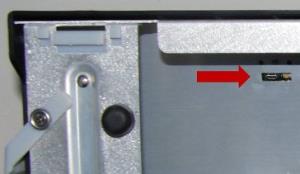
SRX2/SRX3 Headset Maintenance Port
The maintenance port is located behind a protective cover.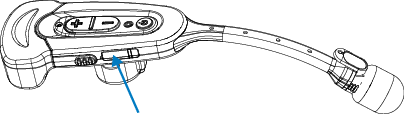
The maintenance port is a USB port used only for maintenance and firmware updates. This port does not charge the headset battery. The battery is only charged in the headset charger when removed from the headset.
-
SRX2/SRX3 Charger Maintenance Port
The charger USB port for both supported chargers is located behind a small metal plate screwed to the back of the charger. A charger update can be performed with batteries mounted on the charger ports and charging. This plate has been removed in the image below.
Do not attempt to update more than one battery charger at a time. Multiple headsets and a single charger can be updated at the same time.
-
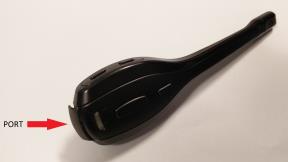
SRX-SL Headset Port
-
-
Launch the utility from the desktop shortcut or installation folder.
-
Click the Scan button to show all connected devices.
-
Click the Select Software button in the headset or charger section of the window.
-
Browse to the location where the update package file was saved.
-
Select the appropriate update file. Refer to the first step in this process for details on update file / device association.
After clicking OK, the Software to be Loaded information at the bottom of the interface displays the versions to installed based on the files selected.
-
-
Click an update button to start the update to the selected software version.
-
To update a single device, click the Update icon associated with the device. Different software files can be set for each device using this method.
-
To update all devices listed, click the Update button in the menu bar.
Do not disconnect the headsets or chargers during the update process. If the update process for a battery charger is interrupted, the application displays a "failed" state. If this occurs, the application may not be able to recognize the charger. Perform the following steps to manually reset the charger.
-
Reset a Charger Manually
- Click the Scan button again to initiate a search for the charger. If the charger is found, follow the previous steps to perform an update. If the charger is not found, unplug the charger from its power source, wait ten seconds for the LED indicator on the front of the charger to turn off, then plug the charger in again and initiate a scan. If the charger is found, follow the previous steps to perform an update.
The application may not be able to identify the charger type after a reset and rescan. A warning message is displayed regarding update file types. Ensure that the correct update file is selected for the charger — .C01 file for the SRX2/SRX3 charger and .C02 file for the A700 battery charger.
-
If the charger is still not found, unplug the charger from its power source and unplug the USB cable connecting it to the computer running the update tool.
-
Locate the small, yellow button in the slot next to the USB port on the back of the charger.
-
Using the tip of a pen, depress the button. Continue holding the button in while plugging the charger into a power source. Then release the button.
-
Plug the USB cable into the computer.
-
Click the Scan button to initiate a search for the charger. Verify the update file type and acknowledge the warning message that appears.
-
Follow the previous steps to perform the upgrade again.
-
Check the update results. When the upgrade completes, the State field shows "finished" and the Progress field shows 100 percent for the devices that have been updated.
-
Check the notifications on the screen for the success or failure status of each device.
-
If a device update fails, disconnect the device from the host machine, then reconnect it. To retry the update, click the Scan button to identify the device, then click the Update Now button associated with that device.
-
If necessary, review the log files in the installation folder to investigate any update failures.
-
-
Disconnect the USB cables and headsets or chargers.
The log files from the software updates take up disk space over time. Delete log files (*.log) from the utility installation location regularly.