SR-15 Behind-the-Head Headset
The SR-15 behind-the-head headset is designed for workers who cannot wear typical over-the-head headset models due to hair style, headwear, or comfort issues.
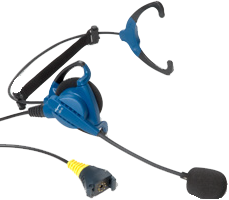
- The behind-the-head headset is a rugged headset designed specifically for speech recognition in industrial and warehouse settings. It comes with an adjustable headband, giving the user a personalized and comfortable fit.
- The behind-the-head headset comes in a single configuration that can be adjusted by the user to be in a right-ear or left-ear orientation.
- The symmetrically designed ear loop can be worn on either ear.
- Honeywell strongly recommends securing the cord to clothing with clips provided for both operational safety as well as to enhance headset stability.
- If the cord can not be easily secured, Honeywell recommends that it be clipped near the center of the headband to evenly distribute any weight caused by a loose cord.
SR-15 Headset Specifications
| Specification | Details |
|---|---|
|
Weight |
3.4 oz (96 g) with cord 2.0 oz (58 g) without cord |
|
Operating temperature |
-40 °F to 122 °F (-40 °C to 50 °C) |
|
Storage temperature |
-40 °F to 158 °F (-40 °C to 70 °C) |
|
Drop Tested |
|
|
Enclosure rating |
Meets IP67 |
|
Humidity |
100% condensing |
|
Noise Reduction Rating |
Not applicable |
| Cord | Straight with Honeywell breakaway connector |
Packaging varies for product shipments. Generally, packing materials are about 15% of the total shipment weight.
Wearing the SR-15 Behind-the-Head Headset
- Loosen the cord at the headband cord clip on the back of the headband to allow enough slack to move the speaker away from the earloop.
- Adjust the nylon band on the adjustment strap so that it lies flat against the headband of the headset.
- Grasp the headset's ear loops and spread them slightly apart.
- Place the headset behind your head, and slip the ear loops over your ears.
- Adjust the headset's speaker so it fits snugly over your ear.
- Place the microphone at the corner of your mouth. Position the microphone as close to your mouth as possible, but outside of your breath stream. It should be facing your upper lip, and not touching anything (for example, clothing, skin, or facial hair).
- Clip the headset cord to your shirt or jacket where it is comfortable.
- Let the cord fall down your back, and clip it to the belt near the device. If you are using a device cover, we recommend that you clip the bottom clip directly onto the cover.
- Adjust the nylon adjustment strap on the back of the headband so that it fits firmly, but comfortably, against the back of your head. The nylon band can be adjusted by sliding the plastic buckle.
- Connect the headset to the device.
Removing the SR-15 Headset Adjustment Strap
- Align the keying rib on the plunger with the slot in the barrel.

- Push the plunger all the way down until the plunger top lip contacts the top of the barrel, making sure the keying rib is inside the keying rib slot.
- With the plunger pressed all the way in, pull the adjustment strap clip to remove it from the headband.

- Repeat these steps for the clip on the other side.
Attaching the SR-15 Headset Adjustment Strap
- Align the keying rib on the plunger with the slot in the barrel.
- Push the plunger all the way down until the plunger top lip contacts the top of the barrel, making sure the keying rib is inside the keying rib slot.
- With the plunger pressed all the way in, place the headband into the slot on the side of the adjustment strap barrel.
- Repeat these steps for the clip on the other side.
Replacing the Headband Cord Clip on the SR-15 Headset
- Unclip the cord from the headband cord clip by pushing the plunger all the way down and gently pulling the cord out of the clip.
- Remove the two screws (part 3 in the figure below). Screws require a Phillips #1 driver. Note that older headband parts may require a Torx or Allen driver.

- Place the headband in the groove of the replacement clip assembly part 2. Place clip assembly part 1 over the headband, aligning with the groove and screw holes on part 2.

- Insert the supplied screws (3) through the holes in clip assembly part 1 and into part 2.
- Tighten the screws with 3.0 in-lbs (0.34 Nm) torque so that there is no gap between parts 1 and 2.
- Using the plunger, attach the cord to the cord clip.
Replacing the Ear Pad on the SR-15 Headset
- With headset removed and disconnected, rotate the headband away from the microphone/speaker assembly.
- If the cord is clipped to the center of the back of the headset, either unclip it or allow enough slack to be able to move the headband away from the microphone/speaker assembly.
- Remove the worn foam cover from the speaker assembly.
- Place the new foam cover over one of the three mounting ribs.
- Gently pull the foam over the other two mounting ribs.
- Rotate the microphone/speaker assembly back towards the headband.
There is an audible click when it is in place.