A700/A700x Device Charger and Battery Charger Wall Mount
The A700/A700x device charger and the A700/A700x battery charger are ready for mounting on a standard DIN rail without any customer modifications. A DIN rail must be installed on a wall in a suitable location. Honeywell offers a DIN rail suitable for mounting a single charger, but customers may choose to purchase rails from other suppliers as long as the rails meet Honeywell specifications. Consider the following before wall mounting your charger.
- Customer assembly required for the rail wall mount.
- Customer assumes all responsibility for the installation of charger units.
- Installer must verify that the installation meets all local building codes.
- Avoid potential hazards (electrical wires, waterlines, and similar building components) when drilling into the wall.
- Avoid blocking power outlets and other wall receptacles when installing the rail and charger.
- Anchoring a wall mount rail to a wall stud generally results in a more stable installation. If you drill into a wall stud, do not use a screw anchor in that hole.
- If you are mounting two chargers side by side, you must leave at least 1 in. (2.54 cm.) of space between the two units to allow clearance for the locking arms.
- Rails must be anchored to the wall at least 12 in. (30.5 cm.) from the floor to allow for proper attachment, seating, and removal of the charger unit.
- If you are mounting a charger directly above another charger, Honeywell recommends clearance of at least 10 in. (25.4 cm.) between DIN rails.
The following image shows the back of the charger and points of interest for mounting the charger to the wall..
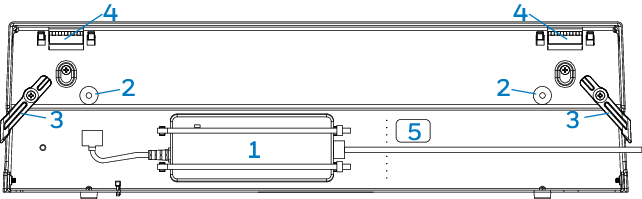
| Part Number in Diagram | Description |
|---|---|
| 1 | power supply |
| 2 | rubber stops for leveling charger against wall |
| 3 | locking arms for securing charger to DIN rail |
| 4 | mounting hooks for hanging charger on DIN rail |
| 5 | USB port for charger software upgrades (only on battery charger) |